Saturday, April 25, 2020

From PeteF: Mixed Bag of Elves for SAGA, Old School Figures and Lizards Rebased (50 points)

Photography Helper

This week's hobbying involved a bit of rebasing and finishing one more unit for SAGA Age of Magic.


The rebased 25mm Napoleonics are Foremost casts that my Dad painted back in the day. There were just enough for three bases which will do for a small french battalion for the Quatres Bras project. So here is the 3rd Battalion of the 108th ligne. The Foremost poses are really nice - I think they were taken over by Hinchcliffe and that you can still get them from Hinds Figures.


The next bit of rebasing was these eight lizards that I used to test out contrast paints and a Kings of War colour scheme last year. In the end I went with firey red, orange and yellow lizards - with not stripes of spots - rejecting the greens and blues. They'll do OK as one point of warriors for SAGA Age of Magic.


The elves are also for SAGA Age of Magic and I've based them on magnets so they can also be put on a metal tray for Kings of War - making a troop of elf palace guard. They got colour shift green armour and I had some fun trying out different Celitc-y designs on the cloaks. I'll field eight of these elves as a point of warriors or maybe 2 points of hearthguard, depending on which faction I choose for them. The factions in SAGA Age of Magic are generic fantasty types: Great Kingdoms, Lords of the Wild, Undead Legions, The Horde, The Otherworld and Masters of the Underneath. So you can play the same miniatures as a few different factions while you figure out which one you like best.


I'm definitely getting the urge to add more Minifigs to the Quatres Bras army (13 battalions, 3 1/2 batteries and a bunch of cavalry to go) - so I'll work on that in the coming weeks... although one of my wargaming friends is talking about Dracula's America and those figures look great.


Iain W 28mm Dux Bellorum again( 50 points)

Bit late in the week but here is the final unit of pagan English for my Dux Bellorum army.
These  are a mix of a final Black tree design that I found after I'd painted all the rest ,a couple of Ebay purchases and seven figures from the 1970s that were painted in enamels, Ral Partha and Asgard and were regularly used as characters and non player characters in D&D games.
I've given them a wash ,touched up the metal here and there and painted the flesh in my usual elf flesh which I have almost used up,bit worrying as I think GW stopped making it years ago and I haven't found a good substitute yet!


I've painted the shields to match the rest of the army.  They're not  terribly kosher as they're mostly Vikings or Varagnians but it uses up some figures that have spent 40 years sitting in various cardboard boxes in various lofts and finishes an army off!
They give me 50 points which added to my running total gives me 345 ,oh and I  know I'll have to finish the sabot bases off at some point!
All the best
Iain

From TomM: Elven Council Circle

Oh I love this model, produced by Dark Realms as part of their February Patreon releases.


Based on the council of Elrond from Lord of the Rings (heck, why do you think I backed that Patreon...) this makes a great display piece for the forces of Rivendell.

After spending about a week on and off printing the model, I sat down and gave it a paintjob to which I put in some more effort then usually for scenery, because it should look epic during Battle Company games.


The pillars where done by basecoating them with Vallejo Earth, then loosely applied Vallejo Heavy Ochre over it.  Consequent drybrushes of Vallejo Yellow Ochre and Iraqi sand brought it to the desired colour.


For the water, it was all Vallejo again, going from a base of Imperial Blue to drybrushes with Intense Blue, Magic Blue and finally Ice Blue, while the rocky edge was vallejo Dark Rubber drybrushed first with Cold Grey and then Sky Grey.


I really like how it turned out as a result, and check out the Patreon if you are into Middle-Earth, it is truly worth the 10USD a month.


From LeeH - Rorke's Drift in 6mm

I'm not really keeping up with this 'post something weekly' thing. I have been doing some painting, but I have been flitting from project to project a bit over the last few weeks. And like many people I have been trying to keep games and friendship groups going online, which all distract's from the paint table. I'm still working full time so my 'spare' time is as limited as ever. Weekends, of course, are being spent at home rather than heading out to Museums and Galleries, but being at home, coinciding with half-decent weather, means I can't get out of doing the garden. The excuse "I don't have time" rings a bit hollow in Lockdown Britain!!

Anyway, it was my Birthday last week and I treated myself to a present from Leven Miniatures. I love their 6mm buildings and this Rorke's Drift model was too good not to buy (and a snip at just £16). 


I'll post some more pictures on my blog tomorrow and, hopefully, I'll also post some video on my youtube channel at the same time. 

I'm currently working on some more Frostgrave figures but rather than show them off one at a time, I'll collect them all together and do a joint post when they are all finished. Nothing fancy, just some new figures to give me some options in my vain attempt to finally win a game against my daughter. 

From DrQ: Some Terrain and a Zombie Bunny

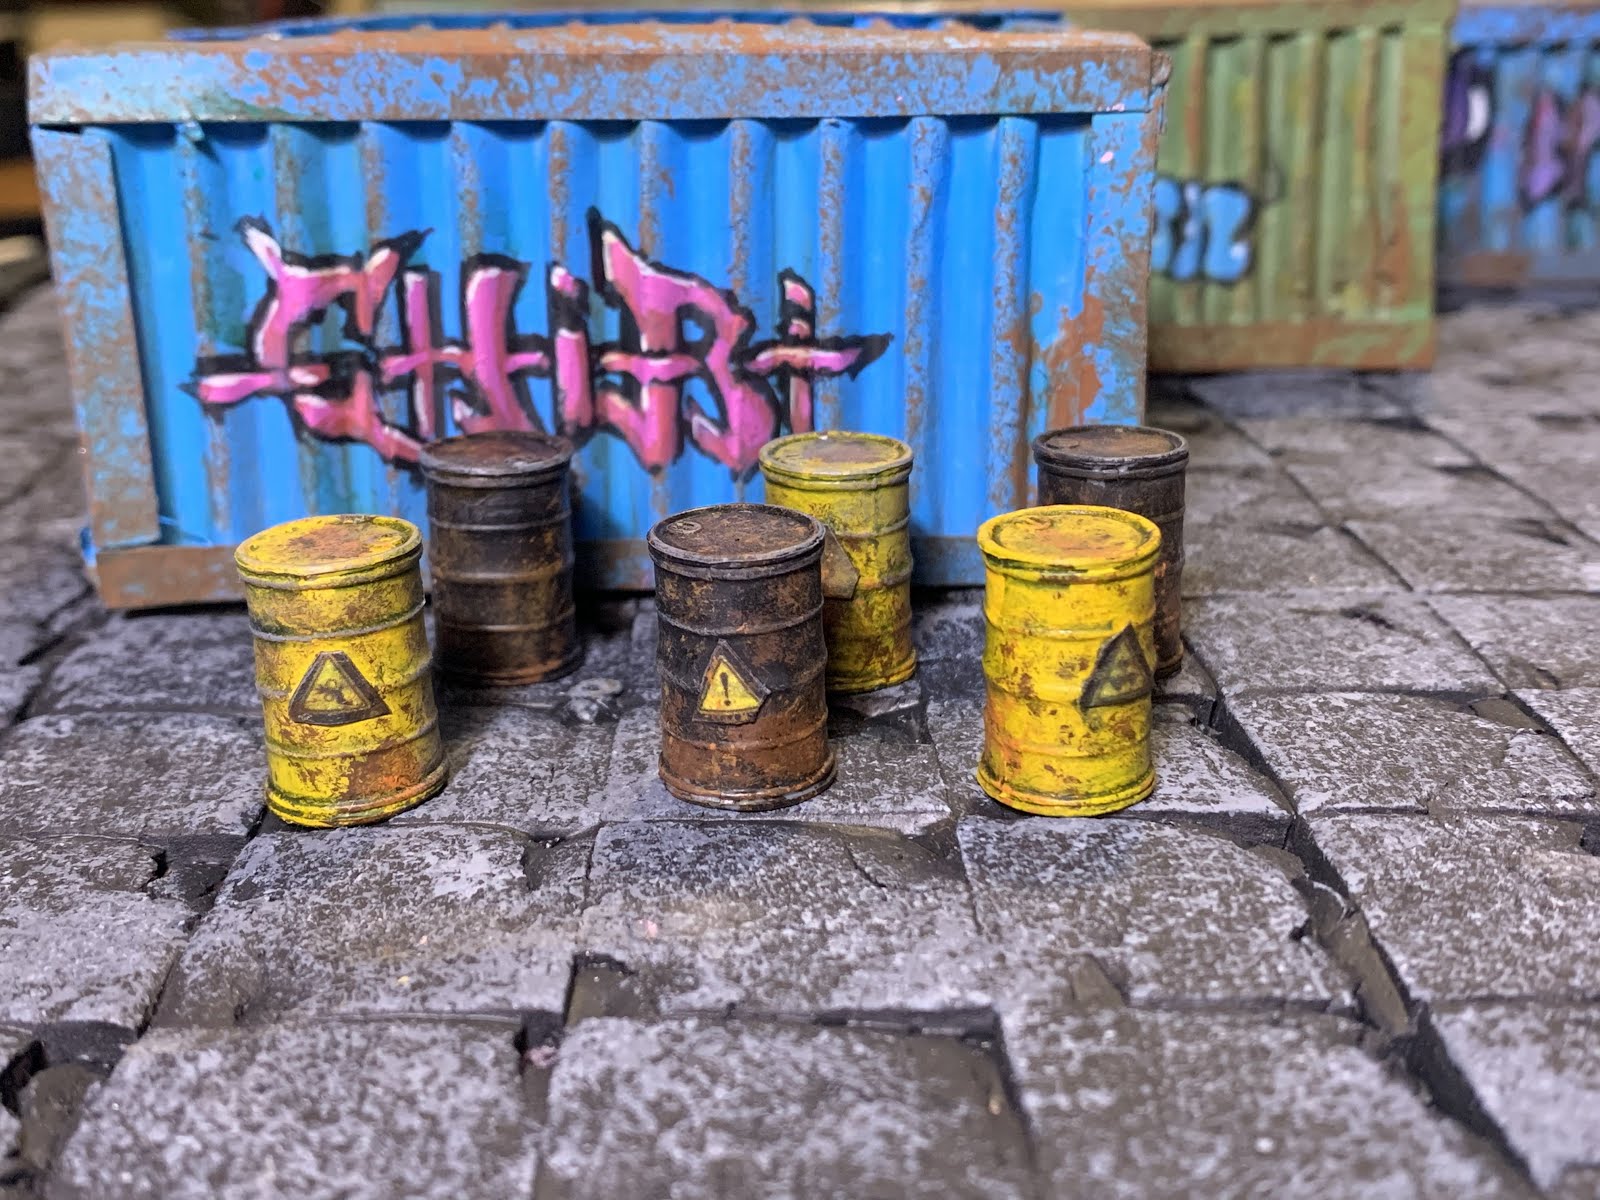
Taking pics last week I realized that I had no suitable modern or futuristic terrain to serve as a backdrop—everything I have is medieval fantasy or steampunk. This was clearly a problem if I want to play games in a contemporary setting, let alone the drimgark future. So, this week I did a little trash-bashing and pulled together these 8 4"x2"x2" container boxes.


The problem with large pieces like this is that you are never sure when to stop. I've painted four layers of weathering, tagged them with various styles of graffiti, and added various torn or whole posters. And yet, they still seem rather sparse when looked at from a distance like this. I could probably spend a few week adding various details, but I'm not going to sweat it at this point. They're here to block line of sight and be more thematic than a plain box or a pile of books, and they excel at that task.

Additionally, I painted up some barrels to sever as smaller scatter. 


Not much to say about these. They are part of Reaper's new Bones Black line. Supposedly they don't need to be primed. I have added a top coat of Mod Podge matte, like I do to all terrain; but we'll have to see if the lack of priming has an effect on their durability.

Finally, I did manage to finish one zombie this week:


Mr. Bitey here is from Super Dungeon Explore's Stilt Town Zombies warband box. While he looks like the stuff of nightmares, he's actually a pet that can help an allied hero. 

Stay safe everyone!

Friday, April 24, 2020

From StuartL - Ogres

Just a small post from me today. 
Back in the winter challenge I painted up a batch of GW Ogres (I refuse to call them by the stupid copyright proof name GW uses). As I still have more of these jolly, fat blokes in the pile I decided to grab a handful and get them tabletop ready. All of the skin was painted with GW contrast paint, which I still cannot seem to get the hang of. The rest of the figures were done with my usual base coat, wash, highlight style.


The Ogre minis are all based on only two bodies on the sprue, so they all have the same pose. However there are a large selection of arms, heads and assorted bits to add to the figures for decoration. My favourite is the slab of ribs hanging on a meat hook.


And here are the AHPC-X and AHQC minis all together.


I believe Ogres are usually scored as 40mm minis, so that should be 42 points for my non-official tally, bringing me up to 494.5

From ClarenceH: Painting All These F-ing Tartans

Captain George H. Rippington III
Here's the full list of paints I used for the Queen's Own Cameron Highlanders and bit of advice on the process. It's for my own benefit as well as everyone else's, so when I inevitably leave off for something else - hopefully not any time soon, but remember the AWI project - and return years later to add to the collection, I'll have some clue as to what I did!

All of the paints are from Games Workshop's Citadel range. A brief note on my shorthand. 'Base Coat' is exactly what it sounds like... a solid layer of color painted as neatly as I can. When this is the same as the 'Primer' color (Zhadri Dust in this case), the area was simply left as is which greatly speeds up the painting process. 'Shade' always utilizes the Citadel range of washes or 'shades' which is painted completely over the base coat. 'Layer' is a color painted on that almost completely covers the color below, leaving the darker tones in recesses. This paint is thinned with a tiny amount of water to add a bit of transparency for a softer transition. If there are two 'Layers' in a sequence, the second is painted only on the upper surfaces (the top of arms, the edge of sleeves, collars, and tunics, etc), again thinned with a tiny amount of water. 'Highlight' refers to edge highlighting where only sharp edges or pinpoint highlights are applied. Don't worry about some variation in tones between models - uniforms would be far less... err... uniform after a few months in the Sudan!

Primer
Zhandri Dust Spray Paint

Helmet, Jacket, and Gaiters
Base Coat: Zhandri Dust
Shade: Agrax Earthshade
Layer: Tallern Sand
Layer: Ushabti Bone
Highlight: Screaming Skull (Helmet Only)

Puggaree
Base Coat: Zhandri Dust
Shade: Agrax Earthshade
Layer: Ushabti Bone
Shade: Reikland Fleshade

Valise Kit, Tassels, and Rifle Sling
Base Coat: Administratum Grey
Shade: Agrax Earthshade
Layer: Pallid Wych Flesh

Sporran, Mess Tin Cover, Scabbard, and Boots
Base Coat: Corvus Black
Shade: Agrax Earthshade
Highlight: Dawnstone

Stockings and Sergeants' Stripes
Base Coat: Mephiston Red
Shade: Agrax Earthshade
Layer: Evil Sunz Scarlet
Stripes: Corvus Black

Musket Stock
Base Coat: Rhinox Hide
Shade: Agrax Earthshade
Highlight: Doombull Brown

Canteen Cover and Pistol Holster
Base Coat: Mournfang Brown
Shade: Agrax Earthshade
Layer: Mournfang Brown
Highlight: Deathclaw Brown

Canteen, Bayonet, Sword Blade, and Rifle Barrel
Base Coat: Iron Warrior
Shade: Agrax Earthshade
Highlight: Stormhost Silver (Bayonet Only)

Buttons, Buckles, Sword Hilt, and Rifle Butt Plate
Bace Coat: Liberator Gold
Shade Agrax Eartshade
Highlight: Liberator Gold

Ok... let's pause here for a moment. If you've read this far (what about the bloody tartan? I'm getting to it...) you've probably seen that ALL of these areas are shaded with Agrax Earthshade. To save yourself a huge amount of time, paint all of the base coats on these areas and then shade the entire model before moving on to anything else. After you've finished all of your layers and highlights, you can go back with Agrax Earthshade if necessary and fix any areas where belts may have strayed into one another, to bring out buttons, etc. This will give you a nice, dark edge around the flesh areas too...

Skin
Base Coat: Bugman's Glow
Shade: Reikland Fleshade
Layer: Cadian Fleshtone
Highlight: Kislev Flesh

Kilt
Ok, here we go.. first of all there is no shading or highlighting required. The pattern is busy and the fact that we've left off this stage won't be noticed and would be an even bigger mess than it already is. Having said this, painting the tartan isn't as difficult as it seems.

First, the diagram...


Don't worry about trying to work out how this falls into folds and such. I start by painting the bottom green stripe above the bottom edge and a parallel one midway between the first and the figure's belt. then paint the vertical stripes as evenly as possible all the way around.


No... Citadel hasn't started making paint in dropper bottles. I made these myself. I'll write a post on it at some point if anyone is interested in the how and why.

Base Coat: Kantor Blue
First Stripes: Waagh Flesh
Intersect Squares: Warboss Green (you can stop here for the Black Watch tartan!)
Red Stripes: Flesh Tearers Red
Yellow Stripes: Averland Sunset

The 'Intersect Squares' will likely end up more as dots than squares, but that's ok. The last two colors should be painted with the finest-tip brush you have. Flesh Tearers Red is a Citadel Contrast paint, which means it is somewhat translucent. This is perfect to mimic the stitching of the real thing. It's also thinner than 'normal' paint, which makes it perfect for painting fine lines. There should be TWO parallel red stripes for each one above, but at 28mm, they are lucky to get one. The yellow stripes seem to fall between every other red, so in the case of my models, there is only one about midway up. There would be vertical yellow stripes in the same manner, but I've chose to pretend they are all hidden in the creases! Since there isn't any shading, you can touch up errant strokes with Kantor Blue or Waagh Flesh as necessary, but you only need to correct egregious mistakes.

Stage by stage photos to better illustrate... looks a bit naff viewed at such size and I shudder to publish such pictures, but no sacrifice on my part is too great for you! The illusion works at normal scale - especially when they are seen from three feet away on the game table.


NOTE: The above figure was painted before I settled on my final khaki recipe so appears a little lighter than the finished versions (see the good captain at the start of the post). I wanted the jacket to be a shade darker to better contrast with the white belts and straps.

Finally, here are recipes for alternate colors you might see on British troops in the Sudan:

Alternate Red Coat
Base Coat: Mephiston Red
Shade: Agrax Earthshade
Layer: Mephiston Red
Highlight: Evil Sunz Scarlet

Alternate Grey Coat
Base Coat: Mechanicus Standard Grey
Shade: Agrax Earthshade
Layer: Mechanicus Standard Grey
Highlight: Dawnstone

Alternate Valise Kit (Bread Bag should still be 'white')
Base Coat: Zhandri Dust
Sade: Agrax Earthshade
Layer: Talleran Sand
Highlight: Ushabti Bone

I would only use the alternate valise kit color with the red or grey coat. Rifle units may still have black valise kits at this time and I would use the same formula as for the mess kit and boots above.

Right! Clear as mud? Hopefully this is useful to someone - at least it will help me later! If you have questions, please don't hesitate to ask.

More soon...